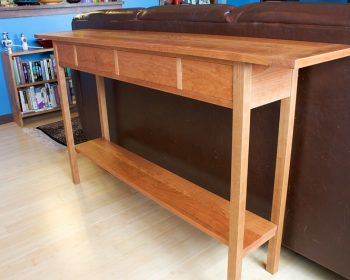
Git Tip of the Day: Stage Hunks

Adam January 13th, 2009

One of the great things about the Git version-control system is the ability to incrementally commit your changes on a private branch to keep a step-by-step record of your thought and writing process on a fix or a feature, and then merge the completed work onto your main [or public] branch after your feature or fix is all done and tested. By keeping an incremental log of your changes — rather than just committing one giant set of code with changes to 30 files — it becomes much easier to know why a certain line was changed in the future when bugs are discovered with it.

One thing that often happens to me though, is that I work for about a half hour to an hour trying to get a new piece of code working and in the process make several sets of changes to one file that are only loosely related.

Let’s say that I am fixing a bug in my ‘MediaLibrary’ class and while doing so notice some some spelling mistakes in some comments that I fix. Now my one file has two changes my bug fix, and the spelling fix. Rather than committing both changes together with one comment describing both changes, I can highlight one of the changes in git-gui and select the “Stage Hunk for Commit” option.

Screen-shot of Staging a Hunk of code

With that one hunk staged I can now commit with a message applicable to that change. Other changes can then be staged and committed with their own messages resulting in a very understandable history of changes.

“Stage Hunk for Commit” can also be used to commit important changes while not including debugging lines inserted in your code.

Twitter Export Script

Adam October 13th, 2008

I have been using Twitter as a log of my daily doings and wished to export my time-line for reformatting into a calender format. Unfortunately TweetDumpr just retrieves the list of Tweets using a single fetch request which is limited by the Twitter API to a maximum of 200 Tweets. (Update: apparently TweetDumpr can get more than 200 Tweets. It just didn’t say so in its description.)

I wanted to export all 600+ of my tweets, so I wrote the following little php script to accomplish this. I have not yet tested it with many concurrent users or added a form to select which user to update. Until I do so, I won’t be providing it as an end-user service. You are free to put it on your own machine and use it though.

TwitterExport.php

<?php
/**
 * This script will allow the export of complete user time-lines from the twitter
 * service. It joins together all pages of status updates into one large XML block
 * that can then be reformatted/processed with other tools.
 *
 * @since 10/13/08
 *
 * @copyright Copyright © 2008, Adam Franco
 * @license http://www.gnu.org/copyleft/gpl.html GNU General Public License (GPL)
 */

$user = 'afranco_work';	// Replace this with your user name.

header('Content-type: text/plain');

$allDoc = new DOMDocument;
$root = $allDoc->appendChild($allDoc->createElement('statuses'));
$root->setAttribute('type', 'array');

$page = 1;
do {
	$numStatus = 0;

	$pageDoc = new DOMDocument;
	$res = @$pageDoc->load('http://twitter.com/statuses/user_timeline/'.$user.'.xml?page='.$page);
	if (!$res) {
		print "\n\n**** Error loading page $page ****";
		exit;
	}
	foreach ($pageDoc->getElementsByTagName('status') as $status) {
		$root->appendChild($allDoc->createTextNode("\n"));
		$root->appendChild($allDoc->importNode($status, true));
		$numStatus++;
	}

	print "\nLoaded page $page with $numStatus status updates.";
	flush();

	$page ++;
	sleep(1);

} while ($numStatus);

print "\nDone loading timeline.";
print "\n\n\n";

$root->appendChild($allDoc->createTextNode("\n"));
print $allDoc->saveXml();


Usage (assuming PHP is installed)

  1. Save the code above on your machine as twitter_export.php
  2. Edit the code to change the $user variable to be your own Twitter username
  3. From the command line run php twitter_export.php
  4. Copy/paste the XML output into a file for safe keeping and further processing

Into the world of wood heat.

Adam October 8th, 2008


For a long time Sarah and I have been dreaming about getting a wood stove, both to add a physical and emotional warmth of our home as well as to offset our usage of heating oil. In September we got our first heating oil delivery at $3.80/gallon and decided that it was time to get off the fence and buy a wood stove. We spent quite a bit of time looking at stoves and fell in love with the the Hearthstone Heritage. A few of the things we liked about it were

  1. It’s made of solid 1.5-inch-thick soapstone which supposedly remains hot for hours after the fire has died.
  2. The stone construction means that the heat is even and less intense than a metal stove, allowing for smaller clearances to the wall and passers-by.
  3. It’s pretty
  4. It is locally made in Morrisville, Vermont.
  5. Side-door for easy loading
  6. Advanced non-catalytic combustion system emits 2.77 grams/hour of particulate matter, a.k.a smoke (average is 5 g/h, older stoves emit 60-90 g/h).

After purchasing the stove a week and a half ago I picked it up from the Chimney Sweep on my utility trailer last Friday and spent the past weekend assembling the hearth pad out of two layers of Micore 300 (an insulating ceramic-fiber board) and some slate tiles. I still need to trim the hearth with wood for aesthetic purposes, but that can wait.

While I was expecting the stove to be heavy, I hadn’t realized how much weight 475 pounds is. There was no way I was going to move this stove alone. This evening (Wednesday) I rented a ramp and wheeled pallet jack to minimize the lifting and recruited the help of 5 strong friends in moving the stove. It took four of us to lift the stove at all and we made use of all six of us shuffling together to carry the stove 4 feet from the pallet jack into its final resting place. That many hands made as light work of the job as possible and all in all the move took about 15 minutes.

This coming weekend I’ll install the chimney if the weather is good and we’ll hopefully soon be heating with wood. Thanks again Alex, Bryan, Dean, John, and Jonathan for your help!

YATS! (Yet Another Thunder Storm)

Adam August 19th, 2008

This has been a crazy summer with only about 5 days between June and mid-August that didn’t have rain. The thunderstorms usually start in the afternoon and sometimes last over night. A few drop several inches of rain at a time causing the flash-floods that have taken out Route 125 several times as well as other bridges and roads.

Flickr and Creative Commons

Adam July 28th, 2008

As a proponent of open-source software and freely usable culture I try to encourage others to make use of my work as much as possible by applying the GNU General Public License (GPL) to all of my software and the Creative Commons Attribution Non-Commercial Share-Alike (CC BY-NC-SA) to any writing or photography.

Aside: The reason I use different licenses is that for software I have a reasonable expectation that commercial use of my software would result in feedback, bug-reports, translations, or patches that would further improve said software, whereas I do not feel that commercial use of photographs without compensation would improve my photography.

While I encourage others to make use of my work, I do expect them to respect the (liberal) license that I have applied to them and properly give credit where it is due. What particularly bugs me is Flickr’s so-so support of Creative Commons licenses. They encourage usage of CC licenses (decent) and display license information on the photo page (good):

Flickr Creative Commons license badge.

But in the HTML snippets that they provide users for showing an image in one’s blog, they do not include any attribution or CC license information as required by the CC licenses (bad).

One of the knocks against the Creative Commons effort as a whole is the lack of clarity as to how attribution should be done in different media. For web publishing however, how to attribute is quite clear – though buried as the 11th item in their FAQ. Major services like Flickr failing to provide good example of attribution and how to properly credit work just makes the whole Creative Commons thing that much less clear for the general public who now find Creative Commons work readily available and with copy-paste code that violates the license by default.

In an effort to push Flickr to provide a good example for users of Creative Commons-licensed works I’ve started the following thread (reposted below) on the Flickr Ideas forum. I encourage others to weigh in if proper attribution is important to you. Such a fix should only take a Flickr developer about 15 minutes to do, but first such a feature needs to hit their radar.


Flickr Ideas: Update embed code to properly attribute for Creative Commons Licenses

As discussed in this Help thread from a year ago, the “Share This” and “All Sizes” embed code does not meet the Creative Commons license requirements for proper attribution. To quote the CreativeCommons.org FAQ:

How do I properly attribute a Creative Commons licensed work?

If you are using a work licensed under one of our core licenses, then the proper way of accrediting your use of a work when you’re making a verbatim use is: (1) to keep intact any copyright notices for the Work; (2) credit the author, licensor and/or other parties (such as a wiki or journal) in the manner they specify; (3) the title of the Work; and (4) the URL for the work if applicable.

You also need to provide the URL for the Creative Commons license selected with each copy of the work that you make available.

If you are making a derivative use of a work licensed under one of our core licenses, in addition to the above, you need to identify that your work is a derivative work, ie. “This is a Finnish translation of the [original work] by [author]” or “Screenplay based on [original work] by [author].”

Further recommendations and guidelines for marking works can be found at the CC Marking project.

The creator’s name (2) and license logo/link (1) are required for proper attibution, but missing from the Flickr-provided embed code. This means that when a user copy/pastes the embed code provided by Flickr, they violate the license by default if they do not take other steps (not mentioned anywhere on Flickr) to give proper attribution.

After no response on the previous thread for a year, TeX HeX has utilized the Flickr API to create an embed code generator at www.ImageCodr.org that can take the URL of any CC licensed Flickr photo and generate the proper HTML code on the fly. This ImageCoder example page provides embed code with the results below:

Note the proper link to the license and attribution of the photographer. Also, note the very understandable description of how the Creative Commons license terms affect usage of the image:
Screenshot of the ImageCoder license overview

I applaud TeX HeX for his wonderful work, but this embed code really should be generated by Flickr itself as only a small percentage of users are going to find their way to ImageCoder.

Please Flickr staff, update the embed code with proper attribution lines so that users of our images can properly attribute by default.

Comment on this thread in the Flickr Ideas forum »

Outside-In: Application Interoperability Using an OSID-Based Framework

Adam June 25th, 2008

This post describes an interoperability demonstration given at OpeniWorld Europe 2008 in Lyon, France.

Abstract

Segue and Concerto are two curricular applications built upon Harmoni, an Open Service Interface Definition-based (OSID) service-oriented application framework. This demonstration will show how website content created in Segue is stored as OSID Assets in Harmoni’s OSID Repository. Similarly, the demonstration will show how multimedia assets created in Concerto can be stored same repository. Interoperability will be demonstrated as each application is used to view and make real-time modifications to the OSID Assets created using the other application, while at the same time respecting the authorizations given to those assets. Additionally, an OSID Repository to OAI-PMH gateway will be shown providing the LibraryFind meta-search tool with access to the metadata for content created in Segue, Concerto, and a lightweight, read-only OSID Repository.

Software Demonstrated:

Segue 2.0 – Beta 20

Adam June 9th, 2008

Another week, another Segue 2 beta. This week’s installation brings visitor registration, a few new themes from Alex, theme migration from Segue 1, and a bunch of little bug fixes.

Visitor registration brings with it a few interesting challenges. As in Segue 1, we want (and need) to be able to allow people outside of the Middlebury community to join in on public discussions hosted in Segue. As well, Middlebury users often need to give access to restricted parts of their sites to people off-campus with whom they are collaborating. Our visitor registration system therefore needs to be easy to use by registrants, keep out spammers, as well as enable searches for visitor accounts by community users.

To keep out spammers, the visitor registration form uses reCAPTCHA to try to verify that a human is sitting at the browser. There are other CAPTCHA systems out there, but I like the philosophy and approach of reCAPTCHA. Starting with words that OCR software had trouble reading seems like a good idea. After the registration form is filled out, Segue sends an email to the address entered with a unique registration code. Until the link in the email is clicked on (and hence the address verified) the account is locked.

To enable easy searching of visitor accounts, visitors are asked to enter their name. While there are a few restrictions on names, these are user-chooseble. To provide some measure of differentiation between verified institution accounts and visitor accounts visitor accounts have the user-chosen name followed by their email domain name in parenthesis, e.g.:

Adam Franco (gmail.com)

I weighed including the entire email address as that is the only verified information we have about the visitor accounts, but I’d rather not open that information up for harvesting by spammers. If abuse becomes an issue, the visitor registration system also supports both black-lists and white-lists of email domains.

Segue 2 – The home stretch begins.

Adam May 19th, 2008

Segue 2 logoWe’ve recently announced our migration plans to the campus: We’ll be rolling out Segue 2 in mid-August for production use in the fall semester.

I’ve now been working on Segue 2 directly or indirectly for 5 years, since June 2003. It has been a long road and it is wonderful to finally be cresting the last rise. That said, as the feature-request tracker indicates, we still have a lot to do over the next 12 weeks.

Theming
This past week I rebuilt the theming system for the 4th (and last before production) time. The challenge with the theming system is that we wanted to enable end-users to choose from a few straight-forward options for things like ‘overall color scheme’, ‘font size’, corner-treatment — not all of which mapped cleanly to CSS properties. As well, to enable more powerful themes, we needed to let theme developers wrap each content type with HTML tags in order to get some effects that are just not possible with plain CSS when the dimensions of the element are not known. Our first three theming implementations involved different PHP classes for each theme with method for setting various options. Each implementation had its own strengths and weaknesses, but they were all hideously complex and required theme developers to know PHP in order to do more than change the CSS. The new theme implementation scraps all of that complexity and defines themes as a set of CSS files and HTML templates, with associated images. An extension to this simple base adds an option listing (defined in XML) that enables placeholders in the CSS and HTML templates to be replaced with values from end-user-choose-able options.

With the new theming system in place in development Alex has set to work building the first three (Rounded Corners, Shadow Box, and Tabs) of the themes that will be distributed with Segue while I’ve been finishing up the user-interfaces for choosing theme options and enabling more advanced users to customize the theme CSS and HTML in their web-browser. So far Alex and I are pretty happy with the new theming system and its simplicity should give it much longer legs than our previous attempts.

While it won’t make it to production, I eventually plan to have a theme-gallery that users can choose to publish their designs to for use by the rest of the community.

Up Next
With theming out of the way the following are some of the next areas I’ll be working on in addition to fixing bugs and working out smaller kinks:

  • Templates – starting points for sites
  • Enabling embedded videos from trusted sites (i.e. YouTube, Vimeo, etc)
  • Visitor Registration
  • Copy/Move tools for Classic Mode
  • Display of RSS feeds

Still a lot to do, but with each addition Segue 2 gets much closer to being able to take over as the primary course website system.

Work updates coming to AdamFranco.com

Adam May 19th, 2008

I’ve been feeling the urge to record a few thoughts and ruminations related to Segue and our other development work in Curricular Technologies at Middlebury College. I already post official project news, write a lot of documentation, and keep a Twitter work-log of day to day details, but something seemed to be missing. Rather than set up yet another blog, I figured that I would just add some work-related things here. I don’t plan on making this a work-only blog, but my personal-life postings are few and far-between enough that a little more content shouldn’t hurt.

If you are only interested in my work-related posts, check my work category or subscibe to its feed. Enjoy!

Sarah's Jewelry Case

Adam April 4th, 2008

For my wife Sarah’s birthday I built her a hanging jewelry case. This was my first fine-woodworking project built out of solid wood and it was quite a learning experience. The case is made of Red Birch with dots of Wenge (black), Satinwood (yellow), Chakte Coc (red), Sucaperē (brown), and Purple Heart (purple). It is finished with three coats of Watco Danish Oil after sanding to 600-grit. The outer dimensions are 23 inches tall, 19 inches wide, and 4 inches deep.

I had originally hoped to construct the case over 2 months of weekends, but this time-line turned out to be a little optimistic and though I didn’t count the hours, it didn’t get completed until 4 months after I started. Work on the project went much faster after I got my own table saw at the end of February and could pop downstairs whenever I had a free moment. Until that point I did most of the work in my friend John Filan‘s shop in Weybridge (VT). John is a wood-artisan, master cabinet-maker, and was an amazing resource throughout this project: from showing me the ropes at Lathrop’s lumber mill, to machine setup, to notes on grain direction. Without his expert help (and workshop, and tools) this project would not have been nearly as successful. While I have so much more to learn, at least I now know where to begin and how to safely and successfully use all of the major machine-tools.

I read (after the fact of course) that it is usually best to start with simple projects before cabinetry to avoid dealing with the close tolerances of all of the joinery and inset pieces. I’d have to agree. Though I consider this project to be a success I did spend many periods just staring at all of my pieces, dry-fitting them, and trying to convince myself that if I trim off 1/64 of an inch off one side that they would all fit together properly.

As I mentioned, the case started as about 20 board-feet of rough lumber stacked on the upper rack of Lathrop’s mill. Once in John’s shop it was flattened on the jointer, planed to thickness and made square, straight and ready for use. I had sketched out most of the design prior to starting, but many things changed over the course of construction. For instance, I hadn’t planned for wood movement so the back panel had to become floating and interior header and footer pieces added to replace the strength I was planning on getting from the panel. Similarly, my initial plans to hang trays on the insides of the doors fell away as I contemplated the additional complexity of cramming them into an already-tight location.

The ring-pillow I made from a piece of foam cut into a wedge-shape with rows then sliced into its surface. I wrapped it in dark red velvet and put stitches in the base of the slices, the ends, and elsewhere to keep it all tightly together.

Happy belated birthday, Sarah!

« Prev - Next »